


National Hedgehog Day
Did you know there’s National Hedgehog Day, celebrated on February 2? It is normally overshadowed by Groundhog Day, since it occurs on the same day. But over the years, hedgehogs have become very popular as pets, all thanks to social media. And don’t worry if you’re not ready to care for a real-life hedgehog. That’s perfectly okay because today, we can create one by using a simple, well-loved book. I’ll show you how!
If you have one hour to spare and enjoy calming and repetitive crafts, then this DIY book-folding hedgehog is the perfect project to do. It is beginner-friendly and fun to do solo or as a family gathered around the table.
Before you begin, a small disclaimer: you need to be comfortable with “destroying” a book. This project involves removing the covers, folding and trimming the pages, and gluing on a few details.
Let’s get started!
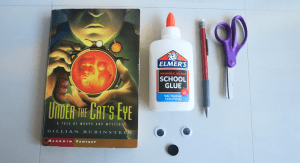
Materials
- Paperback book (at least 150-200 pages)
- Black marker or googly eyes
- Button or pom pom for the nose
- Glue gun or glue
- Scissors
- Pencil
Directions
1. Grab the book and carefully tear off the front and back covers along with the spine.
2. Tear off one of the pages and set it aside. We will need this later to cut out for the ears.
3. Find where 200 pages are in the book and tear off the leftover pages. You can use this for other future book-folding projects.
4. Open out some sections of the book to loosen up the spine. This will help you when folding the pages.
5. Time for the fun part! Grab one page and fold it towards the spine.
6. Then grab the top right corner and fold in towards the spine. Do the same with the bottom right corner and fold into the spine.
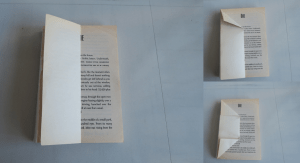
7. Perfect, one page completed. Now repeat those same three folds for the rest of the pages. You may tear off any extra pages if it becomes too difficult to keep folding.
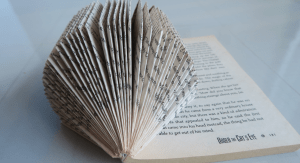
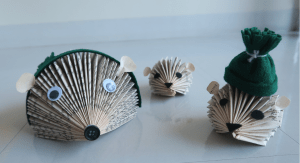
8. Looking good, hedgehog. Now you can add on the eyes and nose with the black marker or whichever materials you have. (pom poms, buttons, etc.)
9. Next, we are going to make the ears. Grab the one page we set aside from earlier. Fold the page in half and draw a guitar pick shape. I drew mine about 1 inch long.
10. Cut out the ears. Then pinch the bottom of the ears and glue them onto the hedgehog’s head.

Now you are all done. I added some baby hedgehogs just so the family feels more complete.
Optional: You can add any other accessories you want to give them more personality. Be creative as you want. You can cut out some paper to make a mustache, quills, feet, legs, and more. I cut out a felt beanie and felt scarf to help keep them warm and cozy. Look at them, ready for the snowy winter.
Come check out The Military Mom Collective Pinterest page to find more crafts to try out.


